In the fall, nothing beats going to the farm and getting apples, apple cider donuts, hot cider, pumpkins etc. etc. Last weekend I went to Cider Hill Farm with my nana, mom, sister and niece, four generations of the same family bobbing around the apple orchard. It's amazing we didn't end up hucking apples at each others heads by the end of the trip, just kidding, it was a truly wonderful day.
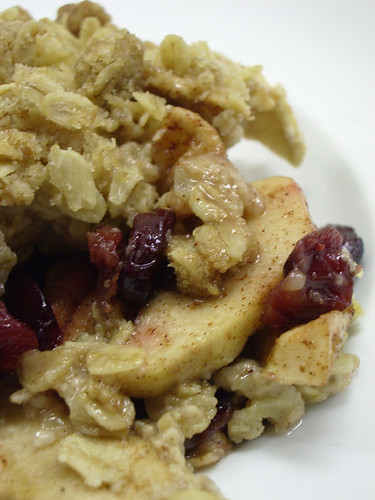
By the time I got back to the City, it was late and dark, I parked my car, got out, and promptly dropped the whole half peck of apples that I bought at the farm onto the asphalt driveway where they proceeded to roll all over the place, under my car, under cars two rows down, toward the scary patch of weeds by the fence where I'm sure rats live although I've never seen one. Did I mention it was late, and dark? I scrambled to catch them before they all rolled into places unknown or inhabited by rats. My big beautiful red apples were now scratched and bruised. When I got in the house I told CB about my apple catastrophe in the parking lot. "I'm not eating any of those apples then" was his reply. Did I mention he's a bit of a neat freak and a germophobe? I figured the only way to make sure that he ate the apples was to first peel them, thus removing any part of the apple that came in contact with the dirty asphalt driveway, and then make something that smelled so delicious with them that he couldn't resist. This is the recipe that did the trick.
Maple Apple Cranberry Oatmeal Crisp
FILLING:
6 cups peeled thinly sliced apples (about 6-8 apples)
1/2 cup dried cranberries (or raisins)
1/3 cup maples syrup
1 tbsp lemon juice
1 tsp vanilla extract
1/2 tsp ground cinnamon
1/2 tsp ground nutmeg
TOPPING:
1 cup quick cooking oats
3/4 cup brown sugar
1/3 c flour
1 tsp cinnamon
1 tsp salt
4 tbsp butter melted
Directions:
Preheat oven to 375. Lightly oil a glass 8-inch square glass baking dish (or 9-inch glass pie plate)
In a large bowl toss the apple slices together with the dried cranberries, maple syrup, lemon juice, vanilla extract, cinnamon and nutmeg. Spread evenly in the baking dish.
Prepare topping by mixing the oats, brown sugar, flour, cinnamon and salt together. Add the melted butter and stir until evenly moistened. Sprinkle evenly over the fruit.
Bake for 35-40 minutes or until the fruit is tender.
Let stand for 20-30 minutes before serving.
Rating = So Damn Good
This recipe is part of the Apple A Day Event organized by swissfruit. I fully believe in the apple a day mantra. I myself try to eat at least on apple a day everyday. You should too.
Friday, September 28, 2007
Wednesday, September 26, 2007
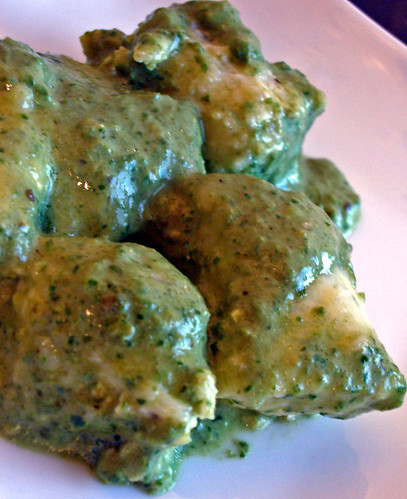
Ricotta Gnocchi with Pesto Cream Sauce
I've wanted to try my hand at gnocchi for a long time now. The most recent issue of Cook's Illustrated had this recipe for ricotta gnocchi among it's pages and I took it as a sign for me to finally pop my gnocchi cherry so to speak. The recipe came with a few pan sauces, but I was in the mood to make pesto, so that's what I did. I'm sure I'll try the other pan sauces some other time, especially considering one calls for fresh sage, which I just happen to have a shit load of in my herb garden.
So first for the pesto I consulted one of my favorite blogs, simply recipes and used her pesto recipe which was just fabulous. I made a double batch, filled an ice cube tray with the extra sauce and froze it for use at a later date. The ice cube tray allows me to just use a few cubes at a time depending on how much I need. Very cool.
For the pesto cream sauce I used about a half cup of the pesto and heated it in a saucepan with about 3/4 of heavy cream, and just let it simmer until I was ready to add the gnocchi to it.
I then went on to making the ricotta gnocchi which was super easy, and as you can see by the picture, came out friggin awesome.
Ricotta Gnocchi - America's Test Kitchen
1 container whole-milk ricotta (15- or 16-ounce)
2 large slices white sandwich bread , crusts removed and bread torn into quarters
1 large egg
2 tablespoons minced fresh basil leaves
2 tablespoons minced fresh parsley leaves
Table salt
1/4 teaspoon ground black pepper
6 tablespoons all-purpose flour , plus additional for work surface
1 ounce Parmesan cheese, grated (about 1/2 cup)
1. FOR THE GNOCCHI: Line fine-mesh strainer set over deep container or bowl with 3 paper coffee filters or triple layer of paper towels. Place ricotta in lined strainer, cover, and refrigerate for 1 hour. Adjust oven rack to middle position and heat oven to 300 degrees.
2. Meanwhile, process bread in food processor until finely ground, about 10 seconds. Spread crumbs on rimmed baking sheet and bake until dry and just beginning to turn golden, about 10 minutes, stirring once during baking time. Let cool to room temperature. (You should have about 1/2 cup crumbs.)
3. Transfer drained ricotta to food processor and pulse until curds break down into fine, grainy consistency, about eight 1-second pulses. Using rubber spatula, combine ricotta, egg, basil, parsley, 1/2 teaspoon salt, and pepper in large bowl. Add flour, Parmesan, and bread crumbs; stir until well combined. Refrigerate dough for 15 minutes. Check texture of dough (see photos below) and add more flour if needed.
4. Lightly dust work surface with flour. With floured hands, roll lemon-sized piece of dough into 3/4-inch-thick rope, rolling from center of dough outward. Cut rope into 3/4-inch-long pieces and transfer to parchment paper-lined rimmed baking sheet. Repeat with remaining dough, dusting work surface with flour as needed.
5. TO COOK GNOCCHI: Bring 4 quarts water to boil in large pot or Dutch oven over high heat. Add 1 tablespoon salt. Reduce heat so water is simmering, then gently drop half of gnocchi into water and cook until all pieces float to surface. Continue to simmer until gnocchi are cooked through, about 2 minutes longer, adjusting heat to maintain gentle simmer. Using slotted spoon, scoop gnocchi from water, allowing excess water to drain from spoon; transfer gnocchi to skillet with sauce and cover to keep warm. Repeat cooking process with remaining gnocchi. Using rubber spatula, gently toss gnocchi with sauce until uniformly coated. Divide among warmed bowls or serving platter and serve immediately.
STEP BY STEP: Proper Dough Consistency
Gnocchi dough should be moist and slightly tacky to the touch. When the proper consistency is achieved, a few crumbs should stick to your finger. If the dough is too wet and a lot of crumbs stick to your finger, stir in additional flour, 1 tablespoon at a time.
Rating = So God Damn Good
Monday, September 24, 2007
Blackberry Basil Crumble | Animal Vegetable Miracle
I'm almost done with the Animal, Vegetable, Miracle the book that Anelise suggested I read. Its a truly wonderful book, and it has some great recipes. If you are at all interested in learning where your food comes from, and how the whole agricultural world works I suggest you pick up this book. I know - agriculture, yawn, but this book is so well written, it reads like a novel, a history lesson, and a cooking lesson, it's fabulous. It's not that I didn't have some grasp of how truly f'd up the whole government control of livestock and farms was, but this book arms you with so many facts and figures, that you just can't help but feel empowered to make better food choices after reading the book. I know really understand why local food may cost more, but why it's worth every penny to buy local.
This recipe is one of the many that are in the book, and also on the website. I'm not going to post the recipe because I'd like everyone to click the link and just mosey around the books website. The recipe can be found on the website by clicking the recipes link.
This recipe takes maybe 15 minutes to pull together and it was so good. We made five individual bowls on Friday, they were all gone by Saturday. A very unique and tasty dessert. Perfect for the summer months when blackberries and basil are in abundance. Enjoy.
Rating = So God Damn Good
Wednesday, September 19, 2007
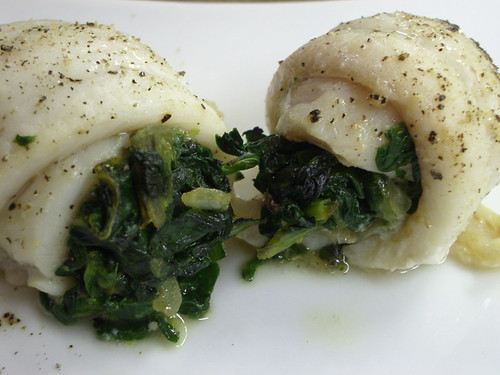
Sole Wrapped Spinach
I don't think I'll ever have a problem eating fish. Maybe it's because I grew up on the north shore with the smell of salt air and ocean turns greeting me in the morning, or maybe, I'm just a hypocrite. I have a hard time eating something with legs, feet and an actual face that you can look at from the front and not have to shake from side to side to see each eye. I don't know, I've just never had a problem eating fish. They only thing that I will say is tough for me is the idea of putting a live lobster in a pot of boiling water. I don't think I'll ever be able to do that.
Anyway, I think CB was just about to drop dead if we didn't have something that wasn't vegetable or tree based for dinner. I had some small sole fillets and a box of frozen spinach in the freezer, and half an onion in the refrigerator. This is what that turned into. I defrosted and drained the spinach, diced the onion and cooked both of them in some olive oil with a little salt and pepper until the flavors had combined, about 10 minutes. I cut each sole fillet in half lengthwise because I was finding some little bones along the spine that I wanted to avoid, so I just trimmed out all the bones. I salt and peppered the sole fillets and then starting at the fat end of the fillet, piled a little bit of the spinach at the end, and then rolled it up tucking the small end of the fillet underneath. I sprinkled the rolls again with salt and pepper and cooked them in a 375 degree oven for 12 minutes.
I won't lie, they were good, but they were too subtle, they lacked something. CB suggested maybe I should have made a white wine sauce to go over the top before serving. I thought maybe I could have added a little feta cheese to the spinach mixture. Then CB said BACON, we should wrap the whole thing in BACON. People, the man absolutely does not listen to me, he has no idea what I am going through right now. I looked at him in shock, then he quickly said FREE RANGE BACON? Okay, he listens a little, but not enough.
Anyway - yes, they were good, but they needed something a little more punchy - if you have suggestions please send them along, because these were a great finger food size, perfect for cocktail parties, and I think they are quite impressive because they aren't your typical scallops wrapped in bacon or chicken wings, so I'd like to try them again.
Recipe:
4 sole fillets cut in half lengthwise
1 box frozen spinach, thawed and drained
1/2 onion minced
salt and pepper
Olive oil
In a large skillet heat olive oil over medium heat, add onion and cook until translucent, add spinach and cook until heated through, about 5 minutes. Season with salt and pepper.
Lay fillets on a large baking sheet sprayed with olive oil spray, season with salt and pepper. Starting at the fat end of the fillet, add about a 1/2 tablespoon of the filling to the end, roll the fish over the spinach mixture all the way to the end, tucking the small end under to keep roll intact. Repeat for the rest of the fillets.
Bake at 375 for 12 minutes.
Rating = So Good
Tuesday, September 18, 2007
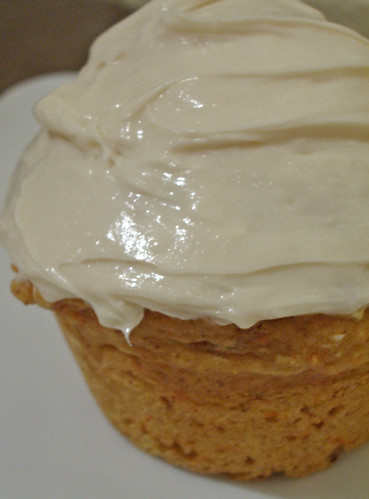
Vegan Oatmeal Carrot Cake Muffins
It's that time of year, carrots, pumpkins, squash, everything orange. Orange is my favorite color, and it's not a far stretch to say that a lot of my favorite foods are orange, including the ones listed above. I've been having a craving for carrot cake, but I don't want all the fat of cake or cupcakes, so I decided to make a bread and muffin recipe that I could eat for breakfast, or top with an icing to eat as dessert at night. I took a recipe that I found on the Quaker Oats website, and made slight modifications so that it would be low fat and vegan. The icing I will say is not vegan, and it's not really low fat, I did use 1/3 less fat cream cheese, but I'm not kidding anyone, it's still fattening. The original recipe for the bread is located here the recipe below is how I modified it to be vegan and lowfat.
Vegan Oatmeal Carrot Cake Muffins
1 cup oats (quick or old fashioned, uncooked)
1/2 almond milk
1 (8-ounce) can crushed pineapple in juice, undrained
1 tbs ground flax seeds mixed with 3 tbs water
1 teaspoon vanilla extract
2 1/2 cups all-purpose flour
1 cup firmly packed brown sugar
1 tablespoon baking powder
1/2 teaspoon baking soda
1/2 teaspoon ground cinnamon
1/4 tsp all spice
1/4 tsp nutmeg
1/4 teaspoon salt (optional)
1 1/2 cups shredded carrots (about 3 medium)
Icing:
4-ounces regular or reduced-fat cream cheese, softened
2 teaspoons firmly packed brown sugar
1/4 teaspoon vanilla extract
Omit to keep muffins vegan.
Heat oven to 375°F. Lightly spray bottom only of 12 muffin tins with cooking spray or grease lightly.
For muffins: Combine oats and milk in medium bowl; mix well. Let stand 10 minutes. Add pineapple (including juice), flax seed mixture and vanilla; mix well.
In large bowl, combine flour, sugar, baking powder, baking soda, cinnamon and salt; mix well. Stir in carrots.
Add oat mixture to dry ingredients all at once; stir just until dry ingredients are moistened. (Do not overmix.) Fill muffin tins to the top.
Bake 20 minutes or until wooden pick inserted in center comes out clean and crust is golden brown. Cool in pan on wire rack 10 minutes. Remove from pan. Cool completely. Store tightly wrapped.
For Cream Cheese Spread: Beat together all ingredients in small bowl until smooth. Store tightly covered in refrigerator up to 3 days.
Rating = So Go Damn Good
PS. You can most definitely add 1/2 raisins or walnuts to the mix - I just didn't have any on hand so I omitted them.
Monday, September 17, 2007
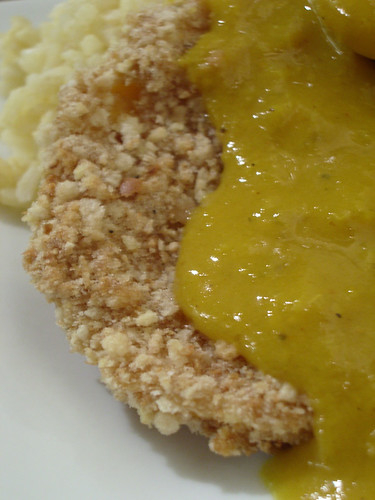
Breaded Butternut Squash with Katsu Curry Sauce
First, my apologies for the fact that this picture makes this dish look unappetizing, I swear to you it tasted awesome, it just is not a very photogenic dish. Please don't let this stop you from making it, because it was great. I first had this dish at Wagamama a few weeks ago and loved it so much that I ran back to my computer after lunch and googled the dish and found the recipe for the sauce on line. The original dish I had had eggplant and butternut squash covered in panko bread crumbs and deep fried. I didn't have panko bread crumbs, so I used regular, and I wanted to keep the dish as low fat as possible, so I opted to bake the squash in the oven (I omitted the eggplant because I had a lot of squash to use up). I will let you know in advance that the recipe that I followed for the sauce make enough to feed a small army, so half the recipe if you don't want to end up freezing 32 ounces of it like I did.
Here Goes
Katsu Curry Sauce (Wagamama)
2 tbsp butter
2 garlic cloves, chopped
half large onion, chopped
3 Granny Smith apples, chopped
2¼ pints water
2 bananas, chopped
2 tbsp honey
1 tbsp ground turmeric
½ tbsp hot curry powder
2 tbsp ketchup
15 fl oz chicken stock (I used vegetable stock)
2 tbsp cornflour
1 tbsp salt
2 tbsp ground black pepper
In a large saucepan, heat together the butter, garlic, onion and apple, mix together and fry briefly. Add in 1¼ pints water, then the banana, honey, turmeric, Madras powder and ketchup. Bring to the boil. Add in the stock. Mix together the remaining water with the cornflour. Add to the curry mixture with the salt and black pepper.
At this point I took the sauce cooled it a little bit and put it in a blender to mix up the bits of apple and banana that had not broken down (be very careful when doing this - hot liquid in blender = big mess if not done right)
For the Butternut Squash: I simply peeled the squash and cut it onto round disks about 1/4 inch thick. I sprayed each side of the disk with canola spray then dredged it in whole wheat flour, then into an egg/milk bath, then into the bread crumbs. I put the butternut squash on a cookie sheet that I had sprayed with canola oil and baked at 350 for 20 minutes, flipping the discs over after ten minutes.
I served the discs over a bed of white rice and then topped them with the curry sauce.
Rating = So Damn Good
Thursday, September 13, 2007
Garlic and Lemon Hummus | ATK Light Recipe
Yeah, as you can see I'm still on the vegetarian bandwagon. I'm just still working through some of my food issues, so while that happens, I hope you enjoy vegetarian fare. I'm sure come Thanksgiving I'll be making cauldrons full of turkey soup, we'll see when we get there.
Two things.
One.
I got on the elevator this morning with a middle aged man, he had salt and pepper hair, and was about my height - I'm five two people, this was not a big man. I noticed that he had a back pack on, which struck me funny that a middle aged man, seemingly on the way to his professional job would chose a backpack, over say a briefcase, or a man's carry all. I was getting off on the seventh floor, he the fourth. As he exited the elevator, I noticed that the back of his backpack had his initials sewed into it, JED. Now this seemed too weird for me, as he exited it was more like he was in seventh grade on his way to science class, not fifty-ish and on his way to work. Am I wrong, are monogrammed backpacks a little too immature for the workplace? I don't know, It just struck me odd this morning.
Two.
A few years ago CB's office had a little open house party for all their clients. Basically it was just appetizers, wine and aren't we great, don't you love us conversation. CB has two bosses, it's a husband and wife team which I think is so great and so super crazy at the same time, if CB and I worked together, I'm sure one of us would not make it out alive. Anyway, when I got to the party, his female boss did hugs and kisses and then proceeded to tell me what kind of food they were offering in the way of appetizers. When we got to the hummus display she said "and we have this lovely whooooo-maaahhs. I shit you not this is how she pronounced it, I nearly burst out laughing, spraying bits of spittle all over her face. I thought she was kidding. She wasn't. I said to CB; "did you have any of the whooo-maaahs", he quickly shushed me, "they both pronounce it that way". Both of his bosses, husband and wife, pronounced it this way - the whole night I nearly peed myself every time anyone got near the hummus display. Am I wrong, is this the way its supposed to be pronounced, I assumed it was pronounced phonetically hum-mus (hummus), not whooomaaahhs. Anyway - now in the house this is how we pronounce it, because it brings a smile to our face, and because we are super mature.
This recipe is from the Best Light Recipes from America's Test Kitchen. It's another winner.
1 (15 oz) can chickpeas drained and rinsed
6 tbs water
3 tbs juice from one large lemon
2 tbs tahini
1 tbs extra virgin olive oil
3/4 tsp salt
1/2 small garlic clove minced
Pinch cayenne pepper
1.Process the chickpeas, water, lemon juice, tahini, 2 tsp of the oil, salt, garlic and cayenne together in the food processor until very smooth, 1 to 1 1/2 minutes, stopping to scrape down the sides of the bowl with a rubber spatula as needed.
2. Transfer the hummus to a serving bowl; cover with plastic wrap and refrigerate until the flavors meld, about 30 minutes. (The hummus covered can be refrigerated for up to 2 days. Bring to temperature and season with additional lemon juice, salt, and cayenne as needed before serving.) To serve, make a well in the center of the hummus, drizzle with remaining teaspoon of olive oil in the well.
Per 1/4 Cup Serving: Call 100; Fat 5g; Sat Fat .5g; Chol 0mg; Carb 10g; Protein 4g; Fiber 3g; Sodium 320mg
Rating = Damn Good
Monday, September 10, 2007
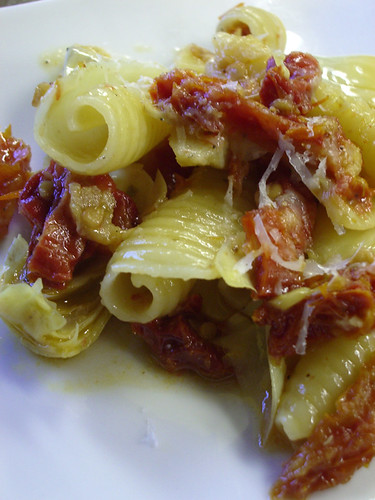
Pasta with Sundried Tomatoes and Artichokes | Lidia's Italy
First let me say that I watched the opening of the MTV video awards last night hoping that Miss Brit Brit would put on a bang up performance, all I can say is, start looking for another gig Miss Britney because you were terrible. It was literally like watching a high school talent show, and she was the lip syncing portion of the night, just horrible. But, may I also say that Sarah Silverman is HILARIOUS. God, that girl is funny. I just don't think enough people get her humor, which is dry and f'ing funny.
Moving right along. I saw Lidia's Italy for the first time on the Create channel a few days ago, and she did a wonderful show with three fast mostly vegetarian pasta dishes. I took a few notes while I was watching the show, and tried to make one of her dishes last night. I will say that there are very few ingredients in this dish, but it is just loaded with flavor. Even CB kept saying how flavorful it was, he also looked me straight in the face and said - "this would be great with some sausage in it." Whaaat? Obviously he doesn't read my blog or listen to me, or he had a temporary brain fart and forgot the whole what are you comfortable eating internal struggle I am having right now. This would be good with some sausage - thanks CB.
Well, for all his talk about the recipe being enhanced by the addition of sausage, he still went back for four helpings so I guess it was fine just the way it was.
Pasta with Sundried Tomatoes and Artichokes
1 lb pasta (use a shaped pasta that has ridges, like Lumache, Orecchiette, Radiatori, something that has ridges for the sauce to stick to)
1 jar sundried tomatoes
1 jar artichoke hearts (in olive oil)
4 garlic cloves sliced
zest of one lemon
salt and pepper
1. While pasta is cooking, heat olive oil in large skillet over medium heat. Add garlic and cook until slightly caramelized, about three minutes. Add sundried tomatoes to the skillet and cook until heated through, add artichoke hearts, heat through. Add the zest of one lemon, heat through. When the pasta is cooked to al dente, off the heat, and add two ladles of the pasta water to the skillet to make the sauce. Drain pasta and add to the skillet, turning over to combine sauce with the pasta.
If you would like to serve this as a vegan dish, just season with salt and pepper. If you would prefer to not serve this as a vegan dish, top with freshly grated Parmesan cheese after seasoning with salt and pepper. Yum
Rating = So Damn Good
Britney = So Damn Bad
PS. I took Anelise's advice and bought Animal, Vegetable, Miracle on Saturday - I can't put it down, it's so good. Thanks Anelise.
Thursday, September 06, 2007
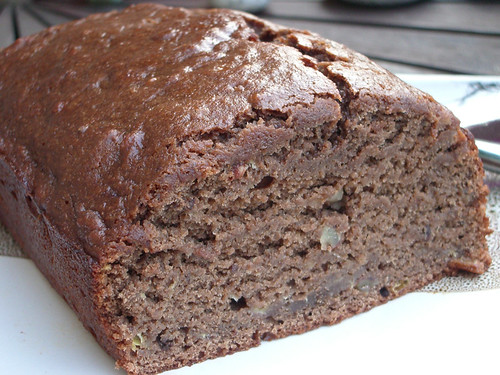
Vegan Chocolate Pecan Banana Bread
I must say that I think this is the best low-fat vegan bread I have made to date out of all of the non dairy/non egg breads I have been attempting over the past few months. The bread actually looked like a normal quick bread, it had good height in the pan, and the density was much better than some of my previous attempts. For this recipe, I just followed a basic non vegan recipe that I found on the Joy of Baking website, and then substituted vegan options where they were needed. I am very happy with the results. I will make a warning that the flax seed does impart a very subtle flavor into the bread, so if you are not a fan of flax seed, I would substitute something else for the egg other than that.
All in all, for me, an excellent experiment. The bread is also virtually fat free, the cocoa, pecans and banana impart some natural fat into the bread, but it's a manageable amount. Let me know if you try this bread, or if you have any vegan baking recipes that you love and want to share. It's when recipes come out this good that I wonder why I ever baked with full fat ingredients in the first place.
Recipe: Vegan Chocolate Pecan Banana Bread
1/2 cup (55 grams) toasted walnuts or pecans, coarsely chopped (I used pecans)
1 3/4 cups (245 grams) all-purpose flour
(I used half whole wheat flour)
1/4 cup (30 grams) Dutch-processed cocoa powder
1 cup (200 grams) granulated white sugar
1 teaspoons baking powder
1/4 teaspoon baking soda
1/4 teaspoon salt
1/2 cup (85 grams) white chocolate chips
(I opted to not use any to keep the fat and calories down)
2 large eggs, lightly beaten
(Vegan Option: 1 tbsp ground flax seed mixed with 3 tbs water for each egg)
1/2 cup (113 grams) unsalted butter, melted and cooled
(Vegan Option: 1/2 c unsweetened applesauce)
3 ripe bananas (approximately 1 pound or 454 grams), mashed well (about 1-1/2 cups)
1 teaspoon pure vanilla extract
Preheat oven to 350 degrees F (180 degrees C) and place oven rack to middle position. Butter and flour (or spray with a non stick vegetable/flour spray) the bottom and sides of a 9 x 5 x 3 inch (23 x 13 x 8 cm) loaf pan. Set aside.
Place the nuts on a baking sheet and bake for about 8 - 10 minutes or until lightly toasted. Let cool and then chop coarsely.
In a large bowl whisk together the flour, cocoa powder, sugar, baking powder, baking soda, and salt. Set aside.
In a medium-sized bowl combine the mashed bananas, eggs, melted butter, and vanilla. With a rubber spatula or wooden spoon, lightly fold the wet ingredients (banana mixture) into the dry ingredients until just combined and batter is thick and chunky. Fold in the nuts and chocolate chips. Scrape batter into prepared pan and sprinkle the top of the bread with coarse brown sugar (optional). Bake until bread has risen and a toothpick inserted in the center comes out clean, about 55 to 65 minutes. Place on a wire rack to cool and then remove the bread from the pan. Serve warm or at room temperature.
Rating = So Damn Good
Tuesday, September 04, 2007
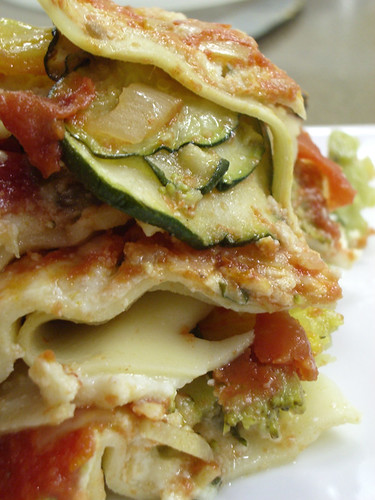
Vegetable Lasagna | America's Test Kitchen
Warning:This post may not be suitable for all readers, it's just food related things that I have been thinking about a lot lately, and I hope that the post doesn't offend anyone, but will hopefully open up a conversation between me and you (the reader) to help me with some issues that I've been having lately.
My problem is that I've been thinking a lot about food, the environmental ramifications of the mass production of food for human consumption, and especially the ramifications associated with the mass production and slaughter of animals for human consumption. Now I've never really been a meat eater, I've most definitely never ordered red meat or pork when out to eat, and I can't remember a time other than when I was very little when I've eaten a hamburger. The issues of red meat, cattle, pork where never my issue, because I didn't eat that. But lately I've been doing a lot of reading about the environmental consequences of other food related issues that I am thoroughly ingratiated in, more specifically, poultry, eggs, and milk products. I've never wanted to think about how many dairy cows it must take to create all the milk that ultimately gets turned not just into milk, but into yogurt, cheese, butter, etc etc. I've never thought about the sheer volume of product that it must take to feed all those cows, and ultimately how much environmental waste all those cows must produce everyday. I've also begun to think about how many chickens, (each taking approximately 34 hours each to produce one egg), it must take to make the dozens of eggs that line the dairy case shelves of all the supermarkets, and not to mention the conditions in which these chicken live. I realize this is a total buzz kill, and I'm sorry, but this blog is about my adventures in food, and this is most definitely one of the adventures that I have faced while writing this blog. I ask that if you have ever faced any food questions, or questioned what you could comfortably eat or not eat, that you please leave me a comment. I would really love to hear any of your thoughts on this subject, and I do realize that this subject is a very personal thing to talk about, so I thank you for reading this post past the warning, and commenting if you chose to do so.
Moving right along, while thinking about this food issue, I decided to look at what vegetarian recipes I had in my cookbook arsenal. I found this recipe in my copy of America's Test Kitchen: The Best Light Recipes. This is not a vegetarian recipe, but you can easily substitute the chicken broth with vegetable broth. It was a bit of a production to put together, but ultimately worth it, and it makes approximately four shit tons worth of food, so I hope you like it, cuz you're gonna be eatin' it for a week if you make it.
Vegetable Lasagna America's Test Kitchen (Light Recipes)
SAUCE
2 (28 ounce) cans diced tomatoes
1 medium onion minced
1 tsp olive oil
sat
6 medium garlic cloves, minced or pressed through a garlic press
2 tbs tomato paste
1/8 tsp red pepper flakes
1 c low sodium chicken broth (or use vegetable stock)
2 bay leaves
1/2 c minced fresh basil leaves
ground black pepper
FILLING AND PASTA LAYERS
1 pound cremini or white mushrooms wiped clean and sliced thin
2 tsp olive oil
3/4 tsp salt
2 medium zucchini, sliced 1/4 inch thick
1 pound fat free ricotta cheese
12 oz reduced fat mozzarella cheese shredded (about 3 cups)
1 oz Parmesan cheese grated (about 1/2 C)
1/2 C minced fresh basil leaves
1 large egg lightly beaten
1/2 tsp ground black pepper
vegetable oil spray
12 no-boil lasagna noodles from one 8-ounce package
1 (10-ounce) package frozen broccoli florets, thawed to room temperature, pressed dry with paper towels, and chopped coarse.
1. FOR THE SAUCE: Process one can of tomatoes with their juices in a food processor until almost smooth, about 5 seconds. Combine the onion, oil, and 1/2 tsp salt in a 12-inch non stick skillet. Cover and cook over medium-low heat until softened, 8 to 10 minutes. Stir in the garlic, tomato paste, and pepper flakes and cook until the garlic is fragrant, about 30 seconds.
2. Stir in the broth, pureed tomatoes, remaining can of diced tomatoes with their juices, and bay leaves. Bring to a simmer and cook, stirring occasionally, until the flavors are blended and the sauce is thickened, about 45 minutes. Remove the bay leaves and stir in the basil. Season with salt and pepper to taste.
3. FOR THE FILLING: Combine the mushrooms, 1 tsp of the oil, and 1/4 tsp salt in a 12-inch skillet. Cover and cook over medium-low heat until the mushrooms have released their liquid, about 8 minutes. Remove the cover and continue to cook until the liquid evaporates, about 5 minutes. Transfer the mushrooms to a bowl; set aside.
4. Add the remaining tsp oil to the skillet and return to high heat until just smoking. Add the zucchini and cook, stirring often until well browned, about 3 minutes. Transfer to a separate bowl; set aside.
5. Mix the ricotta, 2 cups of the mozzarella , Parmesan, basil, egg, pepper, and remaining 1/2 tsp salt together in a large bowl until thoroughly combined. (You should have about 3 cups of filling).
6. TO ASSEMBLE AND BAKE: Adjust an over rack to the middle position and heat the oven to 375 degrees. Spray a 13 by 9-inch baking dish with vegetable oil spray. Spread 1 1/2 cups of the sauce evenly over the bottom of the baking dish.
7. Lay 3 lasagna noodles on top of the sauce, spaced evenly apart. Place 1/3 cup of the filling on top of each noodle and spread it out evenly over the entire noodle using a rubber spatula. Scatter the mushrooms evenly over the filling then spread q1 cup of the sauce evenly over the mushrooms. Repeat this layering twice more, substituting the broccoli and zucchini for the mushrooms (each vegetable has his own layer).
8. Lay the remaining 3 noodles over the top. Spread the remaining 1 1/ cups sauce evenly over the noodles, making sure to cover the edges. Spray a large piece of foil with vegetable oil spray and cover the lasagna tightly.
9. Place the lasagna on a rimmed baking sheet and bake for 45 minutes. Remove the foil and sprinkle the lasagna evenly with the remaining 1 cup mozzarella. Continue to bake, uncovered, until the cheese is bubbling and slightly browned, 10 to 15 minutes longer. Remove from the oven and cool on a wire rack for at least 15 minutes before serving.
PER SERVING: Cal 310; Fat 9g: Sat fat 3.5g; Chol 45mg; Carb 36g; Protein 22g; Fiber 3g; Sodium 150mg
Rating = Damn Good
Subscribe to:
Posts (Atom)