Thursday, December 27, 2007

Manicotti Lineup | ATK

I don't understand why I am not on the payroll at America's Test Kitchen, considering I snub all recipes that do not come from them, own almost all of their books, can't say enough good things about them, and gave almost all living and breathing members of my family one of their cookbooks for Christmas, which will no doubt make them yearn for more. Why Why Why. Well, probably because they don't need me, have no clue I only live a mere two train stops from their test kitchen, think I'm a stalker. I don't know, but Test Kitchen if your listening and you need cookbook reviewers, or you have extra books lying around that are collecting dust you can reach me through this blog. Me, JB at your service. Will work for food.

Seriously though, it was a veritable America's Test Kitchen love fest at my house this Christmas. For dinner I made multiple ATK dishes and then after everyone ate them and asked for the recipes, they all got their own books, which allowed me to say - "Now go make your own damn food and get out of my house." No really I only said that to CB's mother...am I kidding...what do you think? Huh?

One thing that I am absolutely loving about cooking lately is I've been making a lot of dishes that require multiple steps, or better put, dishes that are just easier if you have another pair of hands in the kitchen. This has forced CB to schlep into the kitchen and help me everyime I scream, "I could use a little help in here...maybe you could pause Sports Center for a few minutes and come help a girl out."

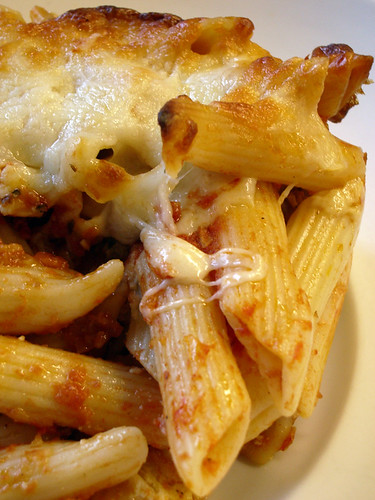
Really though, it's been really wonderful working in the kitchen with CB, the picture above shows the assembly line for the manicotti, and CB starting to roll them up. The work went by fast and I think we enjoyed the dinner even more because we made it together...Barf, just kidding, it tasted great because it came from ATK, not so much because of the togetherness and whatnot, that's total crap.

Stuffed Manicotti ATK
2 (28 ounce) cans diced tomatoes
2 tbsp extra virgin olive oil
3 medium garlic cloves minced
pinch red pepper flakes
salt
2 tbsp chopped fresh basil leaves
ground black pepper
24 ounces whole milk ricotta cheese (about 3 cups)
4 ounces Parmesan cheese grated (about 2 cups)
10 ounces whole milk mozzarella cheese shredded (about 2 1/2cups)
2 large eggs lightly beaten
2 tbsp minced fresh parsley leaves
16 no boil flat lasagna noodles

1. Pulse the tomatoes with their juices one can at a time, in a food processor until coarsely chopped with pieces measuring about 1/4 inch, about 3 pulses, set aside.

2. Heat the oil, garlic and pepper flakes in a large saucepan over medium heat until fragrant but not brown, 1-2 minutes. Stir in the tomatoes and 1/2 tsp salt, and simmer until slightly thickened, about 15 minutes. Off the heat, stir in the basil, season with salt and pepper; set aside.

3. Stir the ricotta, 1 cup of the Parmesan, 2 cups of the mozzarella, eggs, parsley, 1/2 tsp salt, and 1/2 tsp pepper together; set aside.

4. Pour 1 inch of boiling water into a 13 by 9 inch baking dish and slip the noodles into the water, 1 at a time. Let the noodles soak until pliable, about 5 minutes, separating the noodles with the tip of a knife to prevent sticking. Remove the noodles from the water and place in a single layer over clean kitchen towels. Discard the water in the baking dish and pat it dry.

5. Spread 1 1/2 cups of the sauce over the bottom of the baking dish. Use a soup spoon to spread 1/4 cup of the ricotta cheese mixture evenly over the bottom three-quarters of each noodle. Roll the noodles up around the filling, and lay seam side down in the baking dish. Spoon the remaining sauce evenly over the noodles, covering the pasta completely. Sprinkle with the remaining Parmesan and mozzarella.

6. Cover with foil sprayed with non stick spray and bake in a 400 degree oven until the sauce is bubbling and the cheese is melted, about 30-40 minutes. Remove the foil and continue to bake until the cheese is browned in spots 25-30 minutes.

Rating = So God Damn Good


Friday, December 21, 2007

My First Gingerbread House

Not too bad for the first go at it. As much as I find reason to bitch and complain during the holiday season, usually about my in-laws, I do really love this time of year. Yes it's stressful, but it's also so wonderful at the same time. This time of year gives you the excuse to make a house out of gingerbread cookies. I did not make this on my own, I had the much needed help of my sister and her daughter. The house construction was literally an all day affair, which at the end of, my sister and I promptly made martinis and sat back to admire our work. My niece also armed with a hot chocolate topped with enough whipped cream to choke a horse also sat back and admired our first ever gingerbread house. Not too shabby. CB being an architect, was not so impressed, apparently there are some structural flaws and the color scheme is horrid, but who cares.

I won't be posting again until after Christmas. I wish all of you the Happiest of Happiest. Take Care. Be Safe. Merry Christmas.

Tuesday, December 18, 2007

Chocolate Chip, Dark Cherry Cookies

Ah, tis the holiday season when your in-laws will no doubt bug the shit out of you, push all your buttons and make you swear that next, year you are going far. far. away for the Holiday Season.
First, without getting to far into it just let me say that CB's father hasn't worked a day since 1986. He inherited a family business when he was young, and in 1986 sold the business and has not worked a day since, for 20 years. He has been savvy enough to make investments and live off of the profits from those investments. We should all be so lucky. Don't get me wrong, that's great, I think most people would like to live that way, more power to him. Now, let me clarify that CB and I work our asses off to afford the things we have. We have not been offered nor would we accept money from his family. CB works two jobs, he's a residential architect at a design firm and also teaches architecture at a local university. My job is rarely 8-5 and includes multiple late night events it also involves copious amounts of travel, mostly over weekends, never usually falling in the normal work week time. I'm not complaining. I like earning my own way. I love the fact that CB and I owe not one person for the things we have. We've earned it, together.

Another piece of this puzzle is CB's father's girlfriend, surprise surprise, she doesn't work either. She has also been lucky enough to make smart investments that pay dividends that she lives off day to day. My problem is not in the fact that neither of them work, I think most people would love to have the wherewithal to make smart investment decisions that allowed us to live a life not rules by going to work. My problem is this; both of them have enough money to live comfortably without working. This year they decided that they would downplay spending at Christmas and only spend $20 on each other. Great, bravo, you really don't need anything, so don't just buy for the sake of buying.

After they make this decision (the $20 decision) his father turns around and gives us a few ideas for things that we can buy them for Christmas. His father, asked us for a toaster oven, no big deal right? No, he asked for a specific toaster oven that he saw online, to the tune of $100 fucking dollars. He then asks us to get his girlfriend a wooden salad bowl and wooden serving utensils, which generally cost about $50.00. Ok, so let me get this straight. Neither of you work, and yet you're only going to spend $20.00 on each other, but you want us, who work our asses off, to buy your $100 fucking dollar toaster. No. You're not getting the toaster. You're getting a book. Reading is fundamental.

That was my rant for today. Sorry if you were looking for shiny happy people holding hands. Ain't gonna happen today.

However.

These cookies should brighten your day. I adapted a recipe from the Baking Illustrated cookbook from, yep, you guessed it. America's Test Kitchen.

Recipe
2 cups plus 2 tbsp unbleached all purpose flour
1/2 tsp baking soda
1/2 tsp salt
12 tbsp (1 1/2 sticks) unsalted butter, melted and then cooled until warm
1 cup packed light of dark brown sugar
NOTE: I used 1/2 light and 1/2 dark
1/2 cup granulated sugar
1 large egg plus one egg yolk
NOTE: I used a vegan substitute which was 2 tbsp water, 1 tbsp oil and 1 tsp cornstarch
2 tsp vanilla extract
1 1/2 cups semi sweet chocolate chips
1/2 c chopped dried cherries (optional - not in original ATK recipe)

1.Adjust the oven racks to the upper and lower middle positions and heat the oven to 325 degrees. Line two large baking sheets with parchment paper or spray them with nonstick cooking spray.

2. Whisk flour, baking soda and salt together in a medium size bowl, set aside.

3. Either by hand or with an electric mixer, mix the butter and sugars until thoroughly blended. Beat in the egg, yolk (or substitute) and vanilla until combined. Add the dry ingredients and beat at low speed just until combined. Stir in the chips to taste.

4. Roll a scant 1/4 cup of the dough into a ball. Hold the dough ball with the fingertips of of both hands and pull into two equal halves. Rotate the halves 90 degrees and, with jagged surfaces facing up, join the halves together at their base. again forming a single ball and being careful not to smooth the dough's uneven surface. Place the formed dough balls on the prepared baking sheets, jagged surface up, spacing them 2 1/2 inches apart.

5. Bake until the are light golden brown and the outer edges start to harden yet the centers are still soft and puffy, 15 to 18 minutes, rotating the baking sheets front to back and top to bottom halfway through the baking time. Cool cookies on the sheet, then remove with metal spatula. Enjoy.

Rating = Damn Good

Thursday, December 13, 2007

Seafood & Corn Risotto

This is just another one of those instances where pictures just do not do the dish justice. This was awesome. I made the recipe up in my head after having a similar recipe at Todd English's restaurant Figs. First, some women go all gaga over him. I don't get it, I just don't think he's that attractive. Is it the whole fantasy of a man in an apron cooking for you that makes him attractive, or do women really think he's good looking? Oh well, I think he looks a little dirty to be honest, maybe he's "ugly sexy" as some of the Beanies say. I don't know.

Anyway, when I was a Figs a few weeks ago I ordered the shrimp and sweet corn risotto which was to die for. So good that I stopped eating even though I was still hungry, just to make sure that I had some left over for the next day. Which I never go to have because CB ate it, can you believe it?

If I had to do this recipe all again I would have used just shrimp and corn, not the seafood mix that I used because I think it was just too much seafood, and made the dish a little too complex. The corn and shrimp were a nice balance.

Seafood and Corn Risotto JB Original
4 cups vegetable stock (you can use seafood or chicken)
2 cups arborio rice
1/2 cup white wine
1 onion chopped
1 garlic clove minced
1 can sweet corn
1 bag frozen seafood mix (or just use shrimp)
1/4 cup freshly grated parmesan cheese
chopped fresh basil
chopped fresh parsley
olive oil
salt and pepper

Heat the vegetable stock in a pot on medium high heat.

In a separate large pan, heat oil over medium heat. Add diced onion and cook until soft, about 5 minutes. Season with salt and pepper. Add the garlic and cook until soft, about 2 minutes, making sure not to burn. Add the rice and cook until the outside of the rice becomes pearly, about 5 minutes. Add the wine and let cook until it reduces and the alcohol cooks out.

Add two ladles of vegetable stock to the rice mixture and stir constantly until all the stock has been absorbed by the rice, and the rice begins to release it's starch. Repeat the following until all the stock is gone and the risotto is a nice creamy texture. This should take about 20 minutes.

Add the seafood mixture to the risotto when you add the final ladles of vegetable stock. Incorporate into the risotto. Add the corn and the parmesan cheese. Sprinkle with fresh basil and parsley. Season with more salt and pepper if desired.

Rating = Damn Good

I'm trying to remember this recipe from my head because I didn't write anything down when I was doing it. If something seems amiss please let me know.

Monday, December 10, 2007

Rosemary Hummus

I'm not very happy today. I'm sick. I have a very bad stomach ache. I think the Mexican stomach has reared it's ugly head again. Top that off with the fact that a fat man in a car yelled "fuck you" out his window today as I crossed the street, while I had the walk sign, no less. Apparently I wasn't moving fast enough for his fat ass, probably due to the fact that I'm dealing with Montezuma's Revenge in my stomach right now. Thanks Asshole. Merry Christmas to you too, you jackass. Normally I'm full of quick witted responses, and I generally get the better of people when it comes to a battle of wits, but today I just didn't have it in me. I'm going to the doctor this afternoon where hopefully she will give me drugs to kill whatever beast has taken up residence in my GI track and is wreaking holy hell on my insides. Better living through chemistry, isn't that the saying.

Anyway - what I would really like for Christmas other than a settled stomach, would be to be a cookbook reviewer for America's Test Kitchen. I think I would rock the house at that assignment.

This hummus recipe is altered from the one in the Best Light Recipe book that I got at the beginning of the year. I've made this hummus recipe no less than 5 times in the past few months, and every time I bring it somewhere people always comment about how good it is. I adapted the recipe by adding a tablespoon of freshly chopped rosemary leaves to the recipe just at the end of processing. I also use the zest of a whole lemon in addition to the lemon juice that is called for in the recipe.
The rosemary and the lemon pair really well together and make for a fresh and aromatic dip that seems to please all. Also, the woody smell of the rosemary is really great this time of year.

Rosemary Hummus The Best Light Recipes (altered)
1 (15 oz) can chickpeas drained and rinsed
6 tbs water
3 tbs juice from one large lemon plus zest from that lemon
2 tbs tahini
1 tbs extra virgin olive oil
3/4 tsp salt
1/2 small garlic clove minced
1 tbs chopped fresh Rosemary

1.Process the chickpeas, water, lemon juice, lemon zest, tahini, 2 tsp of the oil, salt, garlic and cayenne together in the food processor until very smooth, 1 to 1 1/2 minutes, stopping to scrape down the sides of the bowl with a rubber spatula as needed. Add chopped rosemary and pulse a few more times to incorporate.

2. Transfer the hummus to a serving bowl; cover with plastic wrap and refrigerate until the flavors meld, about 30 minutes. (The hummus covered can be refrigerated for up to 2 days. Bring to temperature and season with additional lemon juice, salt, and cayenne as needed before serving.) To serve, make a well in the center of the hummus, drizzle with remaining teaspoon of olive oil in the well.

Per 1/4 Cup Serving: Call 100; Fat 5g; Sat Fat .5g; Chol 0mg; Carb 10g; Protein 4g; Fiber 3g; Sodium 320mg

Rating = So Damn Good

Tuesday, December 04, 2007

Lite Mac and Cheese | ATK

Fuckety fuck fuck fuck, it is cold out. Arctic. Ass Biting, Cold. Stay under the covers because all the air not under the covers is flipping freezing, cold. Throw your bath towel in the dryer while your in the shower, so you can wrap a hot towel around your wet body, cold. Numb fingertips in a matter of minutes, cold.

Old man winter has a stick up his ass today, with his freezing cold temperatures, and his wind chill, and his horrible frozen sidewalks which when I try to navigate, make me look like a new born deer trying to stand on my legs for the first time, slipping and sliding all over the place praying I don't fall ass over tea kettle all over the place, which I am known to do. Cold.

Nothing warms up the insides like a nice steaming bowl of mac and cheese. Is it not one of the great comfort foods? I think it is. This recipe came from the Best of America's Test Kitchen 2007 cookbook, and without fail is another amazing and simple recipe.

Lite Macaroni and Cheese
1/2 pound elbow macaroni (about 2 cups)
1 (12-ounce) can reduced fat evaporated milk
3/4 C 2% milk (I used plain low fat soy milk)
1/4 tsp dry mustard
1/8 tsp garlic powder or celery salt (I used garlic powder) (optional)
Pinch cayenne pepper (I used chili powder)
2 tsp cornstarch
8 ounces 50% light cheddar cheese, grated (ATK recommended and I used the Cabot 50% cheese. ATK also recommends that you grate your own cheese, and not buy pregrated cheese for better melting)

1. Bring 2 1/2 quarts water to a boil in a large saucepan for the pasta. Add 2 tsp salt and the pasta to the boiling water. Cook, stirring often, until the pasta is completely cooked and tender. Drain the pasta and leave it in the colander; set aside.

2. Add the evaporated milk, 1/2 c of the 2% milk, mustard, garlic powder (if using), cayenne, and 1/2 tsp salt to the now empty saucepan. Bring the mixture to a boil, then reduce to a simmer. Whisk the cornstarch and remaining 1/4 c milk together, then mix it into the simmering mixture. Continue to simmer, whisking constantly, until the sauce has thickened and is smooth, about 2 minutes.

3. Off the heat, gradually whisk in the cheddar until melted and smooth. Stir in the macaroni, and let the macaroni and cheese sit off the heat until the sauce has thickened slightly, 2 to 5 minutes before serving.

(At this point I poured the macaroni and cheese into a glass baking dish, topped with a few breadcrumbs and baked in a 375 degree oven for ten minutes. The recipe didn't call for this, however I like to have a crunchy topping to my mac and cheese, and adding the dry bread crumbs didn't add that much calories to the lite meal.)

Rating = So Damn Good

Wednesday, November 28, 2007

Butternut Squash Lasagna | Everyday Italian

Sweet Jebus, this is some DAMN GOOD LASAGNA. If I wasn't already screaming down the superhighway toward vegetarianism this lasagna would have put petal to the metal on that cause. It is that good people.

My immediate family came to my house for Thanksgiving, I was in charge of the bird (dear God was that hard for me to clean and handle), the stuffing and the aforementioned Pumpkin Pecan Pie; everyone else brought side dishes. My dad brought these amazing mashed potatoes with caramelized leeks and cream cheese (hello THUNDER THIGHS), my Nana brought homemade biscuits, cornbread and candied carrots, my sister made the most amazing homemade cranberry sauce, and apple pie, and my mom brought enough baked butternut squash to choke a horse. The squash was the only leftover that I wanted to transform into something else and I'd heard Giada talk about this recipe on the copious amounts of Thanksgiving segments that the Today show did between Halloween and T-day, so I looked in my cookbook arsenal and there it was in the Giada's Family Dinner book.

Now. I did have a few minor changes from her recipe, the first of which was that she calls for the butternut squash to be cooked in water on the stove top, mine had already been roasted in the oven, so I just pureed the baked squash that I had left over. Second, her recipe calls for three amaretti cookies to be pureed with the squash. I did not have amaretti cookies so I threw in a hand full of cinnamon teddy grahams and added a splash of Amaretto liquor to the squash. Personally, I think my substitutions made the recipe better.

Here is the original recipe from Giada's Book
Butternut Squash Lasagna
1 tablespoon olive oil
1 (1 1/2 to 2-pound) butternut squash, peeled, seeded, and cut into 1-inch cubes
Salt and freshly ground black pepper
1/2 cup water
3 amaretti cookies, crumbled
1/4 cup butter
1/4 cup all-purpose flour
3 1/2 cups whole milk
Pinch nutmeg
3/4 cup (lightly packed) fresh basil leaves
12 no-boil lasagna noodles
2 1/2 cups shredded whole-milk mozzarella cheese
1/3 cup grated Parmesan

Heat the oil in a heavy large skillet over medium-high heat. Add the squash and toss to coat. Sprinkle with salt and pepper. Pour the water into the skillet and then cover and simmer over medium heat until the squash is tender, stirring occasionally, about 20 minutes. Cool slightly and then transfer the squash to a food processor. Add the amaretti cookies and blend until smooth. Season the squash puree, to taste, with more salt and pepper.

Melt the butter in a heavy medium-size saucepan over medium heat. Add the flour and whisk for 1 minute. Gradually whisk in the milk. Bring to a boil over medium-high heat. Reduce the heat to medium and simmer until the sauce thickens slightly, whisking often, about 5 minutes. Whisk in the nutmeg. Cool slightly. Transfer half of the sauce to a blender*. Add the basil and blend until smooth. Return the basil sauce to the sauce in the pan and stir to blend. Season the sauce with salt and pepper, to taste.

Position the rack in the center of the oven and preheat to 375 degrees F.

Lightly butter a 13 by 9 by 2-inch glass baking dish. Spread 3/4 cup of the sauce over the prepared baking dish. Arrange 3 lasagna noodles on the bottom of the pan. Spread 1/3 of the squash puree over the noodles. Sprinkle with 1/2 cup of mozzarella cheese. Drizzle 1/2 cup of sauce over the noodles. Repeat layering 3 more times.


Tightly cover the baking dish with foil and bake the lasagna for 40 minutes. Sprinkle the remaining mozzarella and Parmesan cheeses over the lasagna. Continue baking uncovered until the sauce bubbles and the top is golden, 15 minutes longer. Let the lasagna stand for 15 minutes before serving.

Rating = So God Damn Good

Monday, November 26, 2007

Pumpkin Pecan Pie | ATK

This pie was hell to make, not because the recipe was complicated or advanced, but was simply due to the fact that I had shit for brains and butter fingers the day I attempted to make this recipe. I ended up going to the market, four, count em' four times that day because I kept forgetting ingredients, and one of the times I had to go to the market was because while I was in the midst of combining ingredients for the pumpkin filling, I went to the refrigerator to grab the eggs, and proceeded to drop half a dozen eggs on the kitchen floor, half on the cork tile, half on the carpet. Trying to pick up the eggs was like trying to pick up gobs and gobs of snots, which kept spreading all over the kitchen floor - not fun to clean, especially when you realize, that you need to go back to the store AGAIN, because now you have no eggs, while in the middle of making the pie and baking the pie shell. SHIT.

I just had a bad kitchen day - nothing worked, as my Nana would say, I was so stupid that day couldn't pour piss out of a boot with the instructions written on the heel. If there is a silver lining to this pie making catastrophe it's that the pie, well, it was good as hell, and worth the effort.

Pumpkin Praline Pie
1 (9-inch) pie shell, chilled in pie plate for 30 minutes

Pumpkin Filling
1 (15-ounce) can plain pumpkin puree
3/4 cup packed brown sugar
2 tsp cinnamon
1 tsp ginger
1/2 tsp allspice
pinch cloves
1/2 tsp salt
1 cup evaporated milk
3 large eggs
2 tsp vanilla extract

Praline Topping
1 cup pecans, chopped fine
1/2 cup packed dark brown sugar
pinch salt
2 tsp dark corn syrup
1 tsp vanilla extract
2 tsp granulated sugar

1. FOR THE PIE: Adjust oven rack to the middle position and heat oven to 350 degrees. Line pie shell with foil, cover with 2 cups pie weights (pennies or dried beans are fine too), and bake until dough under foil dries out, 20 to 25 minutes. Remove foil and weights, poke crust several times with a fork, and continue to bake until firmly set and lightly browned, 10 to 15 minutes. Remove pie shell from oven (keep oven on) and set aside. (Shell can be cooled, wrapped tightly in plastic and stored at room temperature for 1 day.

2. FOR THE FILLING: Puree the pumpkin, brown sugar, spices and salt in a food processor until smooth, about 1 minute. Cook mixture in large saucepan over medium high heat until sputtering and thickened, about 4 minutes, and remove from heat. Meanwhile, put pie shell back in oven to warm.

3. Whisk evaporated milk into pumpkin mixture, then whisk in eggs and vanilla. Pour filling into warmed pie shell and bake until filling is puffed and cracked around the edges and center barely jiggles when pie is shaken, about 35 minutes.

4. FOR THE TOPPING: While pie is baking, toss pecans, brown sugar, and salt in bowl. Add corn syrup and vanilla, using fingers to ensure that ingredients are well blended.

5. Scatter topping evenly over puffed filling and sprinkle with granulated sugar. Bake until pecans are fragrant and topping is bubbling around the edges, about 10 minutes. Cool pie completely on wire rack, at least 2 hours. (Pie can be refrigerated up to 2 days) Serve pie at room temperature.

Rating = So God Damn Good.

ALSO - the day after Thanksgiving I was reading my latest Women's Health magazine and there was an article titled Season's Eatings which talked about how to make healthier food choices during the holiday glut, and one tip was to have Pecan Topped Pumpkin Pudding instead of Pecan Pie so go figure, I was being all healthy and whatnot with this pie choice. (Somehow I don't believe that).

I was also in the car a lot this weekend, so I listened to the radio a lot and inevitably every radio dj talked about the holiday food bonanza that is the time between Thanksgiving and Christmas, and one dj mentioned a statistic that seemed so startling to me. He said that the average American puts on 9, (NINE) pounds between Thanksgiving and Christmas. I just could not believe it, it seemed too outrageous. Does this statistic seem plausible to everyone? I was shocked, just shocked, as I feed myself another slice of pumpkin pecan pie.

Monday, November 19, 2007

Chocolate Chip Mint Biscotti

Ok. So, yesterday I did something completely out of the ordinary, I went to see a psychic. My mom had gone to see this woman about six months ago, and was completely taken with her. Looking at my mother and never seeing her before, she told her how many children she had, the gender of her children, and the stages of life each child was in, she also went on to talk about very personal things with my mother that this woman could not have known, in a word my mother believed her.

I'm not facing any big decisions in my life right now that I think need to be answered, but I was curious about this woman, and what she would see in me. So yesterday my mother and I took the trip to go an see her. I didn't know what to expect, so when she asked me why I was there and what questions I wanted answered I didn't have one. She then asked me what the most important thing in my life was, and my instantaneous response is my marriage, that's the most important thing to me. She then said, ok, we'll start with your marriage, "do you have any questions about it," and the only thing I could think of was that I just wanted to check to see that the marriage my husband and I have in the future is as happy and amazing as the marriage we have today. So we started from there, she laid out the cards, and began to read, telling me that my marriage is solid, that there is so much love and respect there, a love and respect that can't and won't be changed, she mentioned that we will never be deceptive or lie to one another. She then began to say things about my marriage that she just couldn't have known, like we own a house in the country in another state (VT) and that we like to take weekend trips to this house just so we can be alone and together, she mentioned that we just celebrated our third anniversary, and that we went on a trip and the thing that grabbed me was she said, you bought a house together before you got married. What? How would this woman know this?

She mentioned that CB and I are planning another trip, but this time it's going to be on the water; in fact, CB and I just started planning a cruise to Alaska, I just picked up the cruise booklet on Friday. What?

I was there an hour, and for an hour she talked about things that she just shouldn't have known, I've never met this woman before, and she's never seen me, and it was very cool and weird at the same time. There was nothing bad, no precautions, no dire warnings, when I left she said, "you and your husband, it's like you're the same person, he's your soul mate." Which I thought was pretty cool.

Have any of you ever been to a psychic? I'd love to hear your stories.

Oh - and CB he loves him some cookies. I used a recipe that I found on another blogger's website called Sarah's Kitchen and modified it a bit.

1 1/4 cup All-purpose flour
1/2 cup dark chocolate chips
1/3 cup Sugar
1/8 c chopped fresh mint leaves
3/4 tsp Baking powder
1 tbsp Water
1 tsp Vanilla extract
1 Egg
1 Egg white
Vegetable cooking spray

Combine first 4 ingredients in a large bowl. Combine water and next 3 ingredients; add to flour mixture, stirring until well-blended (dough will be dry.) Turn the dough out onto a lightly floured surface, and knead lightly 7 or 8 times. Shape dough into a 16 inch long roll. Place roll on a baking sheet coated with cooking spray, and flatten roll to 1 inch thickness.

Bake at 350F for 25 minutes. Remove roll from baking sheet to wire rack, and let cool 10 minutes. Cut roll diagonally into 24 (1/2 inch) slices, and place, cut sides down, on baking sheet. Reduce oven temp. to 325F, and bake 10 more minutes. Turn cookies over and bake an additional 10 minutes (cookies will be slightly soft in center but will harden as they cool.) Remove from baking sheet; let cool completely on wire rack.

Rating = So Damn Good

Thursday, November 15, 2007

Pumpkin Scones with Pecans and Dark Cholocate Chips

This is another recipe that lasted mere nano seconds in my house. The pecans offered a great crunch and the dark chocolate melted all ooey gooey when I cut the scones in half and toasted in the toaster oven, such a great breakfast when served with cottage cheese or applesauce on the side. I did make these before I went away to Mexico, and at that point said F-IT. I'm eating good in the neighborhood; bikini be damned. I altered this recipe from this one on the Joy of Baking website, so it was a bit healthier than the original.

Pumpkin Scones with Toasted Pecans and Dark Chocolate
2 cups all purpose flour
1/3 cup light sugar
1/2 teaspoons ground ginger
1/2 teaspoons ground cinnamon
1 teaspoon baking powder
1/4 teaspoon baking soda
1/4 teaspoon salt
1/4 cup cold unsalted butter, cut into pieces

1/4 c applesauce
1/4 cup dark chocolate pieces (I used 65% cacao)
1/4 cup toasted and chopped pecans
1/3 - 1/2 cup vanilla soy milk
1/2 cup fresh or canned pure pumpkin (if using canned pumpkin make sure there are no spices or sugar added)
1 teaspoon pure vanilla extract


Preheat oven to 400 degrees F (200 degrees C) and place rack in middle of oven. Line a
baking sheet with parchment paper.

In a large bowl, whisk together the flour, sugar, spices, baking powder, baking soda and salt. Cut the butter into small pieces and blend into the flour mixture with a pastry blender or two knives. The mixture should look like coarse crumbs. Stir in the raisins and pecans, if using. In a separate bowl mix together the buttermilk, pumpkin puree and
vanilla and then add the buttermilk mixture to the flour mixture. Mix just until the dough comes together. Do not overmix the dough.

Transfer to a lightly floured surface and
knead dough gently four or five times and then pat the dough into a circle that is about 7 inches (18 cm) round and about 11/2 inches (3.75 cm) thick. Cut this circle in half, then cut each half into 3 pie-shaped wedges (triangles). Place the scones on the baking sheet. Brush the tops of the scones with the egg wash and sprinkle a little Turbinado sugar on top, if desired. (I didn't)

Place the baking sheet inside another baking sheet to prevent the bottoms of the scones from over browning. Bake for about 20 minutes or until golden brown and a toothpick inserted in the middle comes out clean. Transfer to a wire rack to cool.

Makes 8 scones.

Rating = So Gad Damn Good (when toasty warm)

Wednesday, November 14, 2007

Back - and ready to roll

Us at the Mayan Ruins at Coba
Mayan ball field at Coba

CB Climbing down the Great Mayan Pyramid at Coba

The thing I love about going away is the fact that I always want to come home. I love traveling and experiencing new things, but there's nothing like coming home and sleeping in your own bed.

Mexico was great, it was warm, the water was blue, the hotel was amazing, we met amazing people on our trip who we will no doubt keep in touch with, and the people of Cozumel were so nice and genuine.

Our first full day in Mexico we took the 9 hour trip to Coba on the mainland of Playa del Carmen. We sailed on the ferry from Cozumel to Playa del Carmen, and then took an hour and a half bus ride to Coba; one of the Mayan ruins sites on the island, and the only site where you can actively climb the ruins, which was just amazing. After touring the ruins with a Mayan tour guide we stopped off at a small little open air restaurant and ate the best food - CB had chicken, pork, beef, and I had rice, beans and fish. It was soooo good.

We relaxed by the pool, snorkeled in the ocean, ate too much, drank too much, staved off a bit of traveler's diarrhea (I know too much information sorry, and it was bad, must bring antibiotics on next trip to Mexico!)

Glad to back, glad to be cooking and baking, I made risotto and biscotti when I got home yesterday - posts coming tomorrow.


Tuesday, November 06, 2007

8 Days

No posts until next Wednesday at least people. I'm taking a break....sipping cocktails, sleeping past 5 friggin 30, and I'm going to love every minute of it.

And Sweet Jebus please let my eye stop twitching by the end of the week, it's really driving me nuts.

See next week guys. Take Care, Eat Well.

Monday, November 05, 2007

Spaghetti with Eggplant, Butternut Squash and Shrimp | Everyday Italian


Could you possibly spy this eggplant at the market and not buy it? Could you then not bring it back to your office just so you could place it on your desk and wait for your fellow employees to walk by your office and get a glimpse of it, and then take a double take? Could you then not dress up the eggplant, call it Mr. Eggplant Head, and take far too many pictures of it? Well maybe if your mature you can stop yourself from doing all these things, but I am not so I did all of the above, and then I took it home and ate it. In fact, we ate it so fast I didn't get any pictures of the dish, but it was very very good. It was a Halloween recipe from Giada's Everyday Italian. Here Goes.
1/4 cup extra-virgin olive oil
1 large onion, chopped
3 large garlic cloves, finely chopped
1 small butternut squash, peeled, seeded, and cut into 1/2-inch pieces (about 5 cups)
2 Japanese eggplants, cut into 1-inch cubes (I used regular eggplant)
1 teaspoon dried rosemary, crumbled
1 tablespoon chopped fresh thyme leaves
1 1/4 cups dry white wine
2 cups fish broth, fresh or frozen, or canned vegetable broth (I used vegetable broth)
2 pounds uncooked large shrimp, peeled and deveined
Salt and pepper
17.5 ounces orange-colored fresh spaghetti or linguine 1/4 cup (1/2 stick) unsalted butter
Heat the oil in a heavy large nonstick frying pan over medium heat. Add onion and saute until tender, about 5 minutes. Add the garlic and saute for just a minute. Add the squash, eggplant, rosemary and thyme and saute for 8 to 10 minutes. Add the wine and broth and bring to a simmer over medium-high heat. Decrease the heat to medium-low and simmer until the squash is tender and the liquid is reduced by about half, stirring occasionally, about 10 minutes. Add the shrimp and simmer gently until almost cooked through, stirring occasionally, about 5 minutes. Season, to taste, with salt and pepper.

Meanwhile, bring a large pot of salted water to a boil over high heat. Add the pasta and cook until tender but still firm to the bite, stirring often, about 5 minutes. Drain pasta. (Alternatively, you can use dried pasta, which will take 8 to 10 minutes to cook.)

Toss the pasta, squash mixture, and butter in a large bowl until the liquid thickens slightly and coats the pasta. Transfer the pasta mixture to a wide shallow bowl and serve.
Note: I wanted to thicken up the sauce a bit so I dissolved a tablespoon of cornstarch in a few tablespoons of water and added it to the sauce. I think it worked better doing that than if I hadn't.
Rating = Damn Good

Wednesday, October 31, 2007

Witch's Brew

Bubble Bubble Toil and Trouble...Happy Halloween Everyone.

My posts are lacking because I'm pretty much chained to my desk right now. There is a veritable perfect storm or project deadlines I have to deal with. I had one go out last night, one out tonight, another out tomorrow, and then one more has to go out on Friday. I've been at the office from 7:00 am to 9:00 pm everyday since last week and there will be no end to that schedule until Tuesday of next week when I will either be dead from a massive heart attack or I will finally be taking some well deserved time off from work.

So I will try to post a few times over the next few weeks, but no promises. And if you don't see another post before Thanksgiving I am have definitely died and my cat is surely starting to gnaw at my dead decaying body. Let's hope you see posts before Thanksgiving.

The good thing about going to work at the crack of friggin ass, is that you have the most unexpected encounters with people on the street. Just yesterday as I was walking to work a nice man called to me and told me he just wanted to thank me for, and I quote, "making America beautiful". Well isn't that nice. I mean, he was homeless, had about three teeth, and was yelling to me from the bed he had made on the subway steam grate, but you know what, I still smiled, and laughed and thanked him for his kind words. I then pelted off in a hurry hoping that he wasn't following me. The sad thing was, that was the nicest thing anyone said to me yesterday. I should have given him my coffee. He wasn't there this morning when I walked to work, I hope he's ok.

So, I suck. The posts will be here and there from now until Thanksgiving. Believe me, I'd rather be at work writing recipe posts than actually working, but I got bills to pay and they write the checks, so bear with me - it will be better after turkey day.

PS. Yes, I did carve that pumpkin, I got mad skills.

Monday, October 22, 2007

Simply Pumpkin Biscotti

First. I'm working on about 4 hours sleep here because my Red Sox clinched a World Series berth last night (or actually early this morning) and I live in the Fenway, as in the neighborhood named such because Fenway Park is right down the street. After the win, the 34,000 plus fans in the stadium poured out onto the streets, turning the neighborhood into an all out block party. Don't you just love October? Don't you just love baseball in October?

Don't you just love naps, I'm going to need serious cat naps until after the World Series is over, I blame this on Fox Sports, whom it seems can't push first pitch back far enough, the games used to start at 8:00, as in first pitch at 8:00, now coverage at the ball park starts at 8:00 and first pitch happens somewhere around 8:35 or so, causing every game to stretch into the early morning hours, I hate you Fox TV and your stupid Chevrolet commercials, if I hear this is our country one more god damn time I'm going to lose my shit, really - get some new commercials because these are painfully, ear piercingly over played...this is our country ugh.

Anyway - with the games not starting until after 8:00 I seem to be finding more time in the kitchen at night, (considering I'm usually watching the game an hour earlier at 7:00) - so it affords me the opportunity to make even more ass expanding treats, oh joy. No really these are good, and not too fattening. Again, the recipe is from Elise at Simply Recipes and like most of her recipes it was easy and delicious.

Here is the link to her recipe.

Rating = So Damn Good

Thursday, October 18, 2007

Gingerbread Scones

These lasted about 2.5 minutes in my house the day I made them. We just continued to eat them until they were all gone. Did I mention I need to get into a bikini next month for vacation? It's not going to be a pretty sight. Maybe I can buy one of those wraps that people wear around their waists when they go to the beach, but I'll just buy a really big one and hike it up to my neck so it covers my whole body. That should do the trick. Did I mention that this vacation is also all-inclusive, or as I like to call it, Bring on the moo moo, Jules is heading back to the buffet again, why yes, I'll have another frozen drink, I'm sure there are no calories in that, why don't my pants button food plan. It's gonna get ugly. Real ugly. I should be all set for fat pants by Thanksgiving, just put some ropes on my ankles and wrists and put me in the Macy's day parade. Anyway, the recipe is adapted from this Joy of Baking recipe.

1 3/4 cups (245 grams) all purpose flour
3/4 cup (60 grams) old fashioned rolled oats
1/3 cup (72 grams) light brown
sugar
2 teaspoons ground ginger
1 1/2 teaspoons ground cinnamon
1/8 teaspoon ground cloves
1/4 teaspoon salt
2 teaspoons
baking powder
1/2 teaspoon baking soda
1/2 cup (113 grams) cold unsalted butter, cut into pieces (I used 1/4C butter and 1/4C applesauce)
Zest of 1
lemon (optional)
1/3 cup (35 grams) dried cranberries or cherries (optional)
1/2 cup (120 ml) buttermilk (I used soymilk)
2 1/2 tablespoons unsulphured molasses
1 teaspoon pure
vanilla extract


Preheat oven to 400 degrees F (200 degrees C) and place rack in middle of oven. Line a baking sheet with parchment paper.

In a large bowl, whisk together the flour, oats, sugar, spices, baking powder,
baking soda and salt. Cut the butter into small pieces and blend into the flour mixture with a pastry blender or two knives. The mixture should look like coarse crumbs. Stir in the lemon zest and dried cranberries, if using. In a separate bowl mix together the buttermilk, molasses and vanilla and then add the buttermilk mixture to the flour mixture. Mix just until the dough comes together. Do not overmix the dough.

Transfer to a lightly floured surface and knead dough gently four or five times and then pat the dough into a circle that is about 7 inches (18 cm) round and about 11/2 inches (3.75 cm) thick. Cut this circle in half, then cut each half into 3 pie-shaped wedges (triangles). Place the scones on the baking sheet.

Place the baking sheet inside another baking sheet to prevent the bottoms of the scones from over browning. Bake for about 20 minutes or until golden brown and a toothpick inserted in the middle comes out clean. Transfer to a wire rack to cool.

Rating = So Damn Good

Tuesday, October 16, 2007

Fettucine with Walnut Sage Butter Sauce

Another recipe that I saw on Lidia's Italy. It takes oh, approximately 10 minutes to make and is so good. As the pasta cooks you make the simple sauce which includes butter, chopped walnuts and chopped sage, that's it, maybe just a little salt and pepper and some of the pasta water after you have cooked it to al dente. You have no excuse for not making this meal any night of the week. I got the sage from my garden so it was bright and beautiful and fresh, but I assume you can use dried sage if that's what you have at home.

Fettucine with Walnut Sage Butter Sauce
I use all approximate measurements here, I just added what I had on hand.

1 lb fettucine (pasta cooked to al dente)
1/2 stick unsalted butter
1 cup chopped walnuts
10 fresh sage leaves sliced into ribbons
5-10 small sage leaves for garnish
Salt and pepper
grated Parmesan (optional)

While the pasta boils heat butter in a medium size sauce pan, over medium heat. When melted add the walnuts and sage ribbons and cook over medium-low heat until the past is cooked (about 7 minutes). When the pasta is al dente add pasta directly to the sauce in the pan. Add as much of the pasta water as you like to thin the sauce to coat all the pasta, (I added about a cup).

Serve with salt, pepper and grated Parmesan cheese.

Rating = So Damn Good

Thursday, October 11, 2007

Baked Ziti with Ricotta Cheese (and Soy Sausage)

Mmm Mmm Mmm. I made this dish for H&G who just had a baby girl. Needless to say, they haven't been getting a lot of sleep, and don't have a lot of time to cook, with you know, the breast feeding appointment the baby has been making every two hours at cafe leche tits; so CB and I decided to make up some dinner and bring it to them. This was a big hit, super tasty, super filling, super comforting, and G who's a big meat eater didn't even notice that the sausage was soy based and not meat based.

I took this recipe and split it between two 8-inch square baking dishes; I cooked one half and froze other for another night. This recipe came from the America's Test Kitchen, Best Make Ahead Recipes cookbook. Again, I have yet to make a bad recipe from any of their publications. If you don't have one of their cookbooks, do yourself a favor, ask for one for Christmas or Hanukkah or Kwanza, whatever you celebrate during the holiday season. These are such great resources to have in your kitchen. To know that a recipe will always come out great is a real comfort.

Baked Ziti with Ricotta and Sausage America's Test Kitchen
12 ounces whole milk ricotta cheese
4 tbsp extra virgin olive oil
12 ounces whole milk mozzarella cheese shredded (about 3 cups)
3 ounces Parmesan cheese, grated (about 1/2 cups)
1 1/2 pounds ziti or other short tubular pasta
4 1/2 cups Marinara Sauce (I used the ATK Marinara Sauce I blogged here)
1/4 cup chopped fresh basil

1. Bring 6 quarts of water to a boil in a large pot over high heat.

2. Meanwhile, mix the ricotta cheese, 2 tbsp olive oil, 1/2 tsp salt, and 1/2 tsp pepper together, set aside. In a separate bowl, toss the mozzarella, Parmesan together until combined; set side.

3. Add 1 1/2 tbsp salt and the pasta to the boiling water and cook stirring occasionally, until the pasta is just beginning to soften, about 5 minutes. Reserve 1 1/2 cups of the pasta cooking water, then drain the pasta. Return the drained pasta to the pot and stir in the marinara sauce, remaining 2 tbsp olive oil, and the reserved pasta cooking water.

4. Pour half of the sauced pasta into a 13 by 9-inch baking dish. Drop large spoonfuls of the ricotta mixture evenly over the pasta, then pour the remaining sauced pasta over the ricotta layer. Sprinkle the top of the ziti evenly with the mozzarella mixture.

5. TO STORE: Wrap the dish tightly with plastic wrap and then foil and refrigerate for up to 2 days or freeze for up to 1 month. (If frozen, the casserole must be thawed completely in the refrigerator, about 24 hours.)

6. TO SERVE: Adjust the oven rack to the middle position and heat the oven to 400 degrees. Remove the plastic wrap and cover the dish with aluminum foil that has been sprayed with vegetable oil spray (or use nonstick foil). Bake until the sauce bubbles lightly around the edges, 30 to 40 minutes. Remove the foil and continue to bake until the cheese begins to brown in spots and the casserole is completely heated through, 25 to 30 minutes longer. Sprinkle with basil before serving.

TO SERVE RIGHT AWAY: After topping with mozzarella in step 4, bake the casserole in a 400 degree oven, uncovered, until the sauce is bubbling and the cheese is browned, 25 to 35 minutes. Sprinklw with the basil before serving.

Rating = So God Damn Good

Monday, October 08, 2007

Marinara Sauce | America's Test Kitchen

Ok. I know. Marinara Sauce, I've been gone for a week and all you get from me is f'ing marinara sauce. But it's really good, I swear, some of the best marinara sauce to ever grace your lips, so shut up and try it.

Life's been busy to say the least, it seems that every time I turn around another one of my friends has just given birth to another kid. It's no wonder we as a world are facing a population crisis, people are copulating and reproducing like rabbits, I swear. Except for in Russia it seems because just a few weeks ago they had what can only be termed, a stay home and mate until you make a baby damn it day. It seems that the birth rate in Russia is dangerously low, I think it's actually in the negative territory as far as births versus deaths which just seems weird to me because its seems wherever I go there are a veritable shit ton of newborns surrounding me. Its like I'm in a weird caricature and there's me and then all around me there are these little babies, and then hoards of pregnant people and then all the baby accouterments. Its weird.

If I seem harsh I don't mean to be, it's just that when you are in your prime, and happily married people always assume that your next big step in life is to get pregnant, when, in reality, my next big step in life it to try to find enough time to sit the fuck down. I am running crazy everywhere everyday and I just want to sit down without feeling guilty about what I am not doing because I have decided to stop moving for one minute. The other day CB asked why I looked a little stressed out and my only reply was because I felt like it had been at least three months since I had sat down. Now I know that's being over dramatic, but that is how I feel, go go go until you can't go anymore or you have a stroke, and I'm not sure which one is going to come first, so I'm feeling a little stressed and stretched thin.

So, back to the origin of this conversation, the babies, no I don't want to have children, yes, I'm happy as shit for my friends who have just had them, or are pregnant or are trying to get pregnant, but I don't want to have kids, I don 't particularly like wiping my own ass, nevermind someone elses, so let's just leave it there for now. When I'm not so tired, and not in such a heightened state of stress I will explain my mindset and where my heart is in the whole family planning arena, but for now, just know, I'm happy for all the moms, but more happy that I'm not one. And I saw Knocked Up this weekend, and I never need to experience childbirth, ever. I think I'm pretty tough for running three marathons, and I'm sticking to that being the most pain I have ever felt, I don't really need to experience the whole crowning time that takes place during childbirth, no thank you maam.

Oh, wait, did you come here for a recipe and not a diatribe on childbirth, well, I aim to please. Here you go.

Marinara Sauce
2 (28 ounce) cans whole tomatoes packed in juice
3 tbsp extra virgin olive oil
1 medium onion minced
salt
2 medium garlic cloves minced
1/2 tsp dried oregano
1/3 cup dry red wine
ground black pepper
sugar
2 tbsp chopped fresh basil (for serving)

1. Pour tomatoes into strainer set over a large bowl. Using your hands, open the tomatoes and discard any fibrous cores, skins, seeds, being careful to keep the tomato meats whole; let the tomatoes drain for five minutes. Remove 3/4 cup pf the tomatoes from the strainer, set side in a small bowl. Reserve 2 1/2 cup of the tomato juice and discard the remainder of the juice.

2. Heat 2 tbsp of the olive oil in a large dutch oven over medium heat until simmering but not smoking. Add the onion and tbsp salt and cook until softened and lightly browned, 5 to 7 minutes. Stir in the garlic and oregano and cook until fragrant, about 30 seconds.

3. Add the tomatoes from the strainer and increase the heat to medium-high. Cook, stirring occasionally, until the tomatoes begin to stick to the bottom of the pan and a brown glaze forms around the pan edges, 8 to 10 minutes. Add the wine and cook until thick and syrupy, about 1 minute. Add the reserved tomato juice and bring to a simmer, reduce the heat to medium-low and cook stirring occasionally, until th sauce is thick 8 to 10 minutes.

4. Pulse the sauce with the reserved tomatoes in a food processor (or insert an immersion blender) until slightly chunky, about eight 2-second pulses. Return the sauce to the dutch oven, add the remaining 1 tbsp oil, and season with salt and pepper, and sugar to taste.

5. TO STORE: Let the sauce cool uncovered at room temperature for 45 minutes. Transfer to an airtight container and refrigerate up to 2 days.

6. TO SERVE: Transfer the sauce to a medium saucepan, cover and warm over medium-low heat. Stir in the basil and season with salt, pepper and sugar to taste. Thin the sauce with pasta cooking water and extra virgin olive oil as needed when tossing it with the pasta.

Rating = So Damn Good

PS. This recipe can be stored in the freezer in an airtight container for 1 month.

Thursday, October 04, 2007

Back from the land of - eh?

Sorry I haven't posted in a few days. I had to go to Ottawa for work. I had never been, so I was excited to find a little bit of time to do some sightseeing on Tuesday. Another business development person from another company was there with me, so we decided to take the morning off and go tour Parliament. It was very neat, and amazingly beautiful. Here is one of the pictures of the inside of the building that I took while on the tour.

I have a lot of recipes piled up that I want to try, and I have a great marinara recipe that I will post tomorrow. Again, sorry for not posting for a few days, but I had absolutely no internet access while I was there.

JB

Friday, September 28, 2007

Maple Apple Cranberry Oatmeal Crisp

In the fall, nothing beats going to the farm and getting apples, apple cider donuts, hot cider, pumpkins etc. etc. Last weekend I went to Cider Hill Farm with my nana, mom, sister and niece, four generations of the same family bobbing around the apple orchard. It's amazing we didn't end up hucking apples at each others heads by the end of the trip, just kidding, it was a truly wonderful day.

By the time I got back to the City, it was late and dark, I parked my car, got out, and promptly dropped the whole half peck of apples that I bought at the farm onto the asphalt driveway where they proceeded to roll all over the place, under my car, under cars two rows down, toward the scary patch of weeds by the fence where I'm sure rats live although I've never seen one. Did I mention it was late, and dark? I scrambled to catch them before they all rolled into places unknown or inhabited by rats. My big beautiful red apples were now scratched and bruised. When I got in the house I told CB about my apple catastrophe in the parking lot. "I'm not eating any of those apples then" was his reply. Did I mention he's a bit of a neat freak and a germophobe? I figured the only way to make sure that he ate the apples was to first peel them, thus removing any part of the apple that came in contact with the dirty asphalt driveway, and then make something that smelled so delicious with them that he couldn't resist. This is the recipe that did the trick.

Maple Apple Cranberry Oatmeal Crisp

FILLING:
6 cups peeled thinly sliced apples (about 6-8 apples)
1/2 cup dried cranberries (or raisins)
1/3 cup maples syrup
1 tbsp lemon juice
1 tsp vanilla extract
1/2 tsp ground cinnamon
1/2 tsp ground nutmeg

TOPPING:
1 cup quick cooking oats
3/4 cup brown sugar
1/3 c flour
1 tsp cinnamon
1 tsp salt
4 tbsp butter melted

Directions:
Preheat oven to 375. Lightly oil a glass 8-inch square glass baking dish (or 9-inch glass pie plate)

In a large bowl toss the apple slices together with the dried cranberries, maple syrup, lemon juice, vanilla extract, cinnamon and nutmeg. Spread evenly in the baking dish.
Prepare topping by mixing the oats, brown sugar, flour, cinnamon and salt together. Add the melted butter and stir until evenly moistened. Sprinkle evenly over the fruit.

Bake for 35-40 minutes or until the fruit is tender.

Let stand for 20-30 minutes before serving.

Rating = So Damn Good

This recipe is part of the Apple A Day Event organized by swissfruit. I fully believe in the apple a day mantra. I myself try to eat at least on apple a day everyday. You should too.
apple day - September 28, 2007

Wednesday, September 26, 2007

Ricotta Gnocchi with Pesto Cream Sauce


I've wanted to try my hand at gnocchi for a long time now. The most recent issue of Cook's Illustrated had this recipe for ricotta gnocchi among it's pages and I took it as a sign for me to finally pop my gnocchi cherry so to speak. The recipe came with a few pan sauces, but I was in the mood to make pesto, so that's what I did. I'm sure I'll try the other pan sauces some other time, especially considering one calls for fresh sage, which I just happen to have a shit load of in my herb garden.

So first for the pesto I consulted one of my favorite blogs, simply recipes and used her pesto recipe which was just fabulous. I made a double batch, filled an ice cube tray with the extra sauce and froze it for use at a later date. The ice cube tray allows me to just use a few cubes at a time depending on how much I need. Very cool.

For the pesto cream sauce I used about a half cup of the pesto and heated it in a saucepan with about 3/4 of heavy cream, and just let it simmer until I was ready to add the gnocchi to it.

I then went on to making the ricotta gnocchi which was super easy, and as you can see by the picture, came out friggin awesome.

Ricotta Gnocchi - America's Test Kitchen
1 container whole-milk ricotta (15- or 16-ounce)

2 large slices white sandwich bread , crusts removed and bread torn into quarters
1 large egg
2 tablespoons minced fresh basil leaves
2 tablespoons minced fresh parsley leaves
Table salt
1/4 teaspoon ground black pepper
6 tablespoons all-purpose flour , plus additional for work surface
1 ounce Parmesan cheese, grated (about 1/2 cup)


1. FOR THE GNOCCHI: Line fine-mesh strainer set over deep container or bowl with 3 paper coffee filters or triple layer of paper towels. Place ricotta in lined strainer, cover, and refrigerate for 1 hour. Adjust oven rack to middle position and heat oven to 300 degrees.

2. Meanwhile, process bread in food processor until finely ground, about 10 seconds. Spread crumbs on rimmed baking sheet and bake until dry and just beginning to turn golden, about 10 minutes, stirring once during baking time. Let cool to room temperature. (You should have about 1/2 cup crumbs.)

3. Transfer drained ricotta to food processor and pulse until curds break down into fine, grainy consistency, about eight 1-second pulses. Using rubber spatula, combine ricotta, egg, basil, parsley, 1/2 teaspoon salt, and pepper in large bowl. Add flour, Parmesan, and bread crumbs; stir until well combined. Refrigerate dough for 15 minutes. Check texture of dough (see photos below) and add more flour if needed.

4. Lightly dust work surface with flour. With floured hands, roll lemon-sized piece of dough into 3/4-inch-thick rope, rolling from center of dough outward. Cut rope into 3/4-inch-long pieces and transfer to parchment paper-lined rimmed baking sheet. Repeat with remaining dough, dusting work surface with flour as needed.

5. TO COOK GNOCCHI: Bring 4 quarts water to boil in large pot or Dutch oven over high heat. Add 1 tablespoon salt. Reduce heat so water is simmering, then gently drop half of gnocchi into water and cook until all pieces float to surface. Continue to simmer until gnocchi are cooked through, about 2 minutes longer, adjusting heat to maintain gentle simmer. Using slotted spoon, scoop gnocchi from water, allowing excess water to drain from spoon; transfer gnocchi to skillet with sauce and cover to keep warm. Repeat cooking process with remaining gnocchi. Using rubber spatula, gently toss gnocchi with sauce until uniformly coated. Divide among warmed bowls or serving platter and serve immediately.

STEP BY STEP: Proper Dough Consistency
Gnocchi dough should be moist and slightly tacky to the touch. When the proper consistency is achieved, a few crumbs should stick to your finger. If the dough is too wet and a lot of crumbs stick to your finger, stir in additional flour, 1 tablespoon at a time.


Rating = So God Damn Good